
Salads
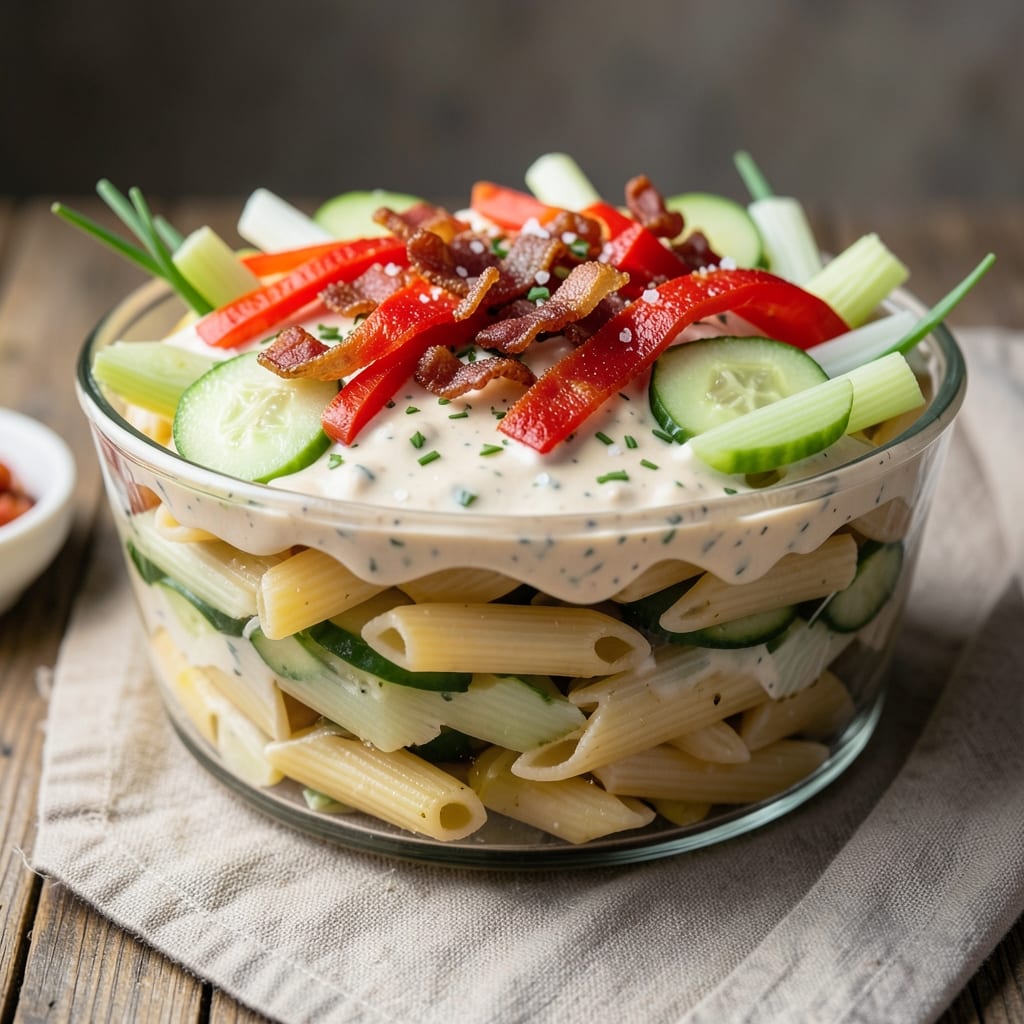
This 9-layer salad delivers restaurant-style comfort with layers of crisp vegetables, creamy textures, and bold flavors—all stacked neatly for a showstopping presentation. The secret lies in precise assembly: each layer builds flavor and crunch, from the sturdy base to the final garnish. No fancy equipment needed—just a clear glass bowl and patience for the perfect stack.
The magic happens in the balance of textures: crisp celery and cucumbers contrast with creamy dressing-soaked pasta, while toasted nuts add crunch. I developed this recipe to satisfy cravings for hearty salads without the mess of loose ingredients. The dressing binds everything together, ensuring each bite is packed with flavor and satisfying bite.
What you’ll end up with is a visually stunning salad that’s as delicious as it looks—ideal for potlucks, office lunches, or a special dinner. The layers stay intact when sliced, making it perfect for serving guests. Plus, it’s customizable: swap proteins, adjust textures, or tweak flavors to match your preferences.
Prep time is minimal, and the assembly process is straightforward, but the result feels like a gourmet creation. This salad proves comfort food doesn’t have to be heavy—just layered with intention. Ready to build yours?
Ingredients for 9 layer salad
Nine layers of texture and flavor—crisp, creamy, and satisfyingly stacked for a showstopping salad.
| Ingredient | Amount | Notes |
|---|---|---|
| Short Pasta (Penne or Fusilli) 🍝 | 2 cups | Cooked al dente, drained |
| Creamy Ranch Dressing 🥛 | 1 ½ cups | Homemade or store-bought |
| Celery Sticks 🧅 | 2 cups | Thinly sliced, crisp |
| Cucumber Slices 🥒 | 2 cups | Peeled, thinly sliced |
| Red Bell Pepper Strips 🌶️ | 1 ½ cups | Thinly sliced, raw |
| Cooked Bacon Bits 🥓 | 1 cup | Crisp, chopped |
| Shredded Cheddar Cheese 🧀 | 1 ½ cups | Medium sharp, freshly shredded |
| Toasted Pecans 🌰 | 1 cup | Chopped, lightly toasted |
| Dried Cranberries 🍇 | ½ cup | Chopped if large |
| Fresh Parsley 🌿 | ¼ cup | Chopped, for garnish |
| Diamond Crystal Kosher Salt 🧂 | ½ tsp | For seasoning |
| Freshly Ground Black Pepper 🌶️ | ¼ tsp | For seasoning |
| Extra-Virgin Olive Oil 🫒 | 1 tbsp | For layering |
The pasta forms the sturdy base, so choose a short shape like penne or fusilli—they hold up better than long noodles. Cook it al dente and drain well, then toss with a tablespoon of olive oil to prevent sticking. For the dressing, homemade ranch (mayo, buttermilk, herbs) elevates the flavor, but a quality store-bought like Hidden Valley works too. The celery and cucumbers need to be crisp and fresh—look for firm, bright produce at the store. If using pre-sliced cucumbers, rinse them well to remove excess moisture. Bacon adds a smoky depth, so cook it crisp and chop it finely for even distribution. The pecans should be toasted until golden—this brings out their natural sweetness and adds a satisfying crunch.
No fresh parsley? Dried parsley at half the amount works in a pinch, but fresh is ideal for that bright pop of color. Swap the cheddar for Monterey Jack or pepper jack if you prefer a milder or spicier profile. For a vegetarian option, replace the bacon with crispy chickpeas or toasted breadcrumbs. The cranberries can be subbed with dried apricots or raisins if you prefer something sweeter. If your bell peppers are large, roast them first for extra flavor—just slice them in half, brush with olive oil, and roast at 425°F for 15 minutes. The key to perfect layers is even distribution, so don’t be shy with measuring cups and spreading each layer evenly.
This salad keeps beautifully in the fridge for 3-4 days, but the layers start to blur after day two, so serve it fresh for the best presentation. If prepping ahead, assemble it the night before and refrigerate uncovered to let the flavors meld. The dressing will soak into the pasta and veggies, creating a cohesive bite. For serving, use a clear glass bowl—it makes the layers pop and looks stunning on the table. If you’re bringing it to a potluck, pack it in a cake carrier to keep the layers intact. Leftovers? It reheats surprisingly well—just microwave for 30 seconds with a splash of water to revive the crispness.
Why You'll Love This Recipe
- No Chopping Chaos: I swear by this one—just slice the celery into sticks, halve the cucumbers, and strip the bell pepper while watching a single episode of my favorite show. No knife skills required, just clean cuts that still look fresh.
- Creamy Crunch Magic: That ranch dressing clinging to the penne? Absolute perfection. The cool, herby bite of the celery and bell pepper cuts through the richness, and the cucumber adds that refreshing snap—like a hug for your taste buds after a long day.
- Potluck Proven: Between us, this is my go-to dish for gatherings. It’s hearty enough to feed a crowd but light enough for summer picnics, and honestly? No one ever leaves with leftovers. (Well, except my aunt, who takes half home every time.)
- Budget-Friendly Bulk: Pasta, veggies, and ranch? This salad keeps costs low while filling plates. I make a double batch on Sundays—half for lunch, half to stash in the fridge for when I’m too tired to cook. No fancy ingredients, just pure, satisfying flavor.
Step-by-step instructions for building your 9-Layer salad
This layered salad comes together faster than you'd think—just follow the order and press down gently at each layer.
Cook and Prepare the Pasta Base
Start by cooking the 2 cups short pasta according to package instructions until it's al dente. Drain immediately and rinse under cold water to stop the cooking process. This prevents the pasta from becoming mushy when layered. I like to spread it on a baking sheet to cool slightly—this makes it easier to handle when building the salad.
While the pasta cools, lightly toss it with 1 tablespoon extra-virgin olive oil and 0.5 teaspoon diamond crystal kosher salt. This step ensures each layer gets that perfect balance of flavor without overwhelming the other ingredients. The oil helps the pasta hold together better when stacked, creating a sturdy foundation for your salad tower.
Layer the Vegetable Foundation
In a large glass or ceramic dish (about 9x13 inches works perfectly), begin by spreading the cooled pasta evenly across the bottom. Then add 1 cup cooked bacon bits and 1.5 cups shredded cheddar cheese, distributing them evenly. This layer gives your salad that rich, savory backbone.
Next, add 2 cups celery sticks and 2 cups cucumber slices, spreading them out in an even layer. The crispness of these vegetables contrasts beautifully with the cheddar and bacon. Press down gently with a spatula—this prevents the layers from shifting when you cut into it later. The celery and cucumber should be arranged neatly, with no gaps between the pieces.
Add the Sweet and Crunchy Layers
Sprinkle 1.5 cups red bell pepper strips evenly over the vegetables. The bright color and crisp texture will pop against the creamy cheese and rich bacon. Then add 1 cup toasted pecans and 0.5 cup dried cranberries, distributing them uniformly. These ingredients add a delightful crunch and a touch of sweetness that balances the savory elements.
Here's the thing—don't skimp on pressing down each layer. Use the back of a spoon or a flat spatula to gently compact everything. This isn't just about looks; it ensures clean slices when you serve. The pecans and cranberries should be scattered throughout, not clumped in one spot.
Finish with Dressing and Garnish
Pour the 1.5 cups creamy ranch dressing evenly over the entire salad. Use a spoon to gently spread it across the top, making sure it seeps down between all the layers. This step is crucial—it binds everything together and creates that signature creamy texture you love in a 9-layer salad.
Finally, sprinkle 0.25 cup fresh parsley and 0.25 teaspoon freshly ground black pepper over the top. The parsley adds a fresh pop of color, while the pepper enhances the flavors. Let the salad sit at room temperature for 10-15 minutes before serving. This allows the dressing to fully absorb and the flavors to meld together perfectly.
Chill and Serve with Confidence
Cover the salad and refrigerate for at least 1 hour before serving. This chilling time is what transforms your salad from good to extraordinary. The flavors will deepen, the dressing will fully integrate, and the layers will hold their shape beautifully when sliced.
When ready to serve, use a sharp knife to cut the salad into neat squares or wedges. The layers should stay intact, revealing that satisfying rainbow of colors with each slice. Serve immediately while still cold—this salad is best enjoyed fresh out of the fridge, with all the flavors at their peak.
Pro Tips For Making 9 Layer Salad
- COOL PASTA FIRST: Drain the penne or fusilli just before assembling—no soggy bottom layers. I learned this after watching my first batch turn into a sad, waterlogged mess by the time I got to the dressing. Toss the pasta with a light spray of olive oil right after draining to keep it from sticking like glue.
- CHOP CELERY UNIFORM: Cut celery sticks into ¼-inch pieces—same length as cucumber slices and bell pepper strips. Nothing ruins the layers faster than mismatched sizes making the salad look like a hot mess. Use a mandoline if you’re impatient, but watch your fingers—I still have the scars.
- DRESSING LAST MINUTE: Save the ranch dressing until the very end, then fold it in gently with a rubber spatula. Adding it early makes the cucumbers and peppers release water, turning your crisp salad into a soggy disaster. Trust me, the first time I didn’t do this, I cried into my coleslaw.
- LAYER BY COLOR: Arrange ingredients by hue—lightest at the bottom (pasta), then cucumbers, peppers, celery, and finally the creamy dressing on top. This isn’t just for looks; it keeps the crunchy layers from getting drowned out by the ranch. Your guests will notice the effort, even if they won’t admit it.
Make-ahead tips for leftovers
Prep Ahead Strategy
Assemble your salad the night before and refrigerate it uncovered. This allows the dressing to fully soak into every layer, creating a cohesive bite. The flavors meld beautifully overnight, making each slice taste even more delicious. Trust me, this is the secret to restaurant-quality results at home. ✨
Storage Containers
Use a clear glass bowl with a tight-fitting lid to maintain the layers during storage. I recommend a 9x13-inch Pyrex dish—it’s sturdy and keeps everything intact. If you’re packing it for a potluck, transfer it to a cake carrier just before serving to preserve that perfect stack.
Layer Stability Tips
Press each layer gently with a spatula or the back of a spoon to prevent shifting. For extra stability, chill the salad for at least 1 hour before slicing. The cold temperature firms up the ingredients, making clean cuts effortless. This is especially important if you’re prepping ahead.
Reheating Leftovers
Leftovers reheat surprisingly well! Microwave individual portions for 30 seconds with a splash of water to revive crispness. For a stovetop option, warm gently in a pan with 1 tablespoon olive oil over low heat for 2-3 minutes. The layers may soften slightly, but the flavors stay vibrant.
Freezing Options
While not ideal for texture, you can freeze this salad for up to 2 months in an airtight container. Thaw overnight in the fridge, then reheat gently. The pasta and veggies will be softer, but the flavors remain intact. Perfect for a quick meal when you’re short on time.
Serving Prep
Slice the salad into neat squares or wedges just before serving to showcase the layers. Use a sharp chef’s knife and cut straight down—this ensures clean slices every time. Garnish with extra parsley or a drizzle of olive oil for a fresh finish. Your guests will be impressed by the presentation! 💫
Nutrition facts
Frequently asked questions
Can I make this salad without pasta?
Swap the pasta for 2 cups cooked quinoa or 2 cups chopped potatoes (boiled and cooled) to keep the structure sturdy. For a lighter option, try 2 cups chopped romaine lettuce or cabbage wedges—just press the layers more firmly to prevent collapse. The key is maintaining a solid base that holds together when sliced.
How do I keep the layers from falling apart when slicing?
Press each layer firmly with a spatula after adding it—this creates compression that keeps everything intact. Chill the salad for at least 1 hour before slicing, as the cold temperature firms up the ingredients. Use a sharp knife and cut straight down with confidence; no sawing motions! For extra stability, add 1 extra tablespoon of mayo to the dressing to bind the layers better.
What’s the best way to transport this salad?
For potlucks or picnics, transfer the assembled salad to a cake carrier (like a round metal ring) just before serving to maintain the shape. If you must transport it in the bowl, use a clear plastic wrap pressed directly on top to prevent shifting. Keep it refrigerated until serving—never leave it in a hot car. The layers will stay intact if handled gently and kept cold.
Can I make this salad ahead for a party?
Yes! Assemble it completely the night before and refrigerate uncovered. This lets the dressing soak in fully, creating a more cohesive texture. Cover and refrigerate for 1-2 hours before serving to let flavors meld. For a crowd, slice it into portions just before serving—this keeps the presentation fresh and prevents sogginess. The longer it sits uncovered, the more flavorful each bite becomes!
What’s the secret to making it taste better?
Toast your nuts and bacon for deeper flavor, and use freshly shredded cheese (pre-shredded contains anti-caking agents that make it grainy). For extra richness, add 1 tablespoon sour cream to the dressing or sprinkle with crumbled blue cheese in the final layer. The contrast of warm (toasted nuts) and cool (creamy dressing) elements elevates every bite—trust the texture play!