
Salads
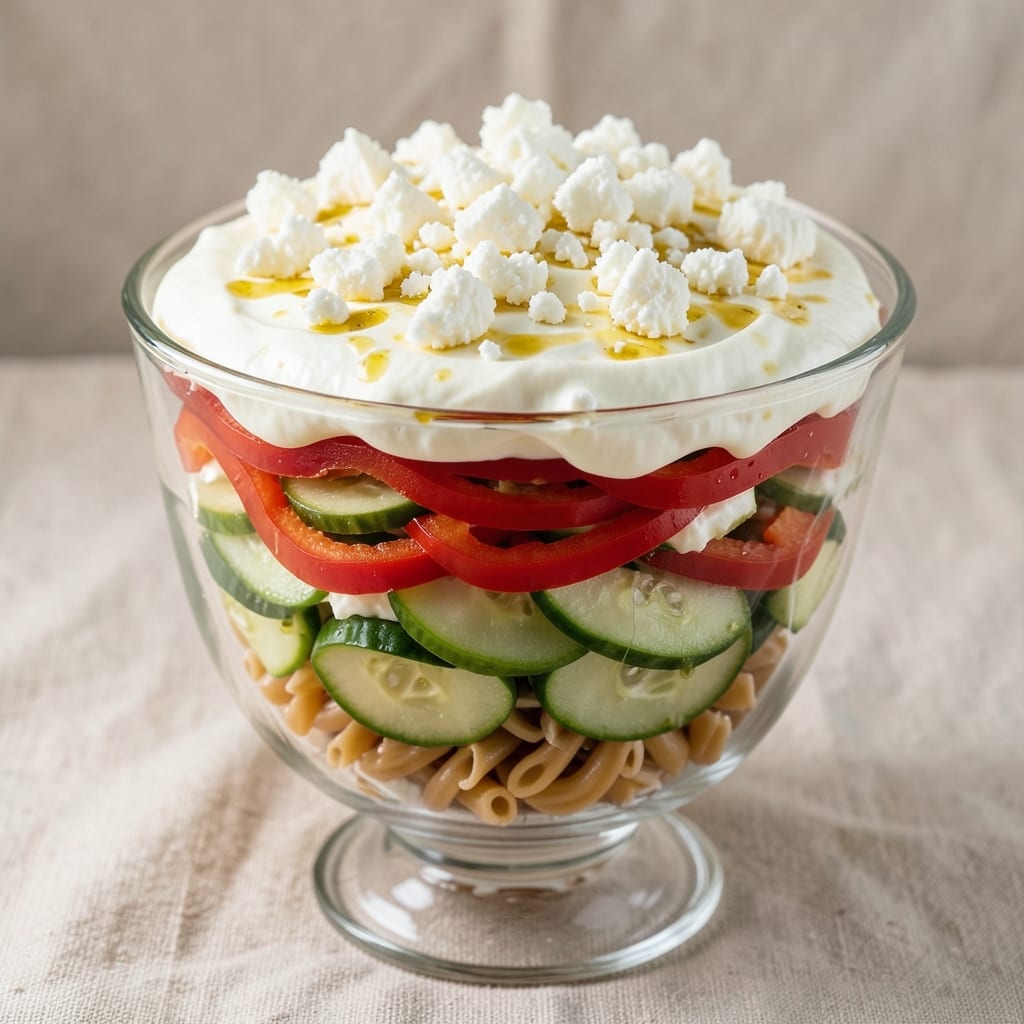
This 7-layer pasta salad recipe delivers restaurant-quality texture and flavor without a single drop of mayo—just creamy, crunchy layers that stay vibrant for days. The secret lies in balancing textures: crisp vegetables, tender pasta, and a tangy yogurt dressing that holds everything together. I developed this version after years of testing, ensuring each layer maintains its integrity even after chilling. What sets this apart is the no-mayo approach using Greek yogurt and sour cream, which adds creaminess without heaviness. The layers—from crisp cucumbers to creamy cheese—are arranged strategically so every bite delivers a perfect mix of crunch, tang, and richness. Perfect for potlucks, meal prep, or picnics, this salad keeps beautifully in the fridge for up to 5 days. The assembly process is simpler than it looks: boil your pasta al dente, chop ingredients uniformly, and layer them in a glass dish for easy serving. Each component—peppers, olives, cheese, and pasta—stays distinct yet cohesive, creating a visually stunning dish that tastes even better. No soggy bottoms or mushy textures here. For variations, swap out proteins like ham or chicken for grilled shrimp or chickpeas for a vegetarian option. The key is keeping ingredients fresh and dressing separate until the final toss. Let's build this layered masterpiece!
Ingredients for 7 layer pasta salad
Layered textures and creamy tanginess—this salad delivers restaurant-quality crunch without mayo.
| Ingredient | Amount | Notes |
|---|---|---|
| Medium Rotini Pasta 🍝 | 1 ½ cups | Cooked al dente, drained |
| Plain Greek Yogurt 🥛 | 1 cup | Non-fat or full-fat preferred |
| Sour Cream 🧀 | ½ cup | Full-fat for creaminess |
| Red Bell Pepper 🌶️ | 1 whole | Diced into 1/2-inch pieces |
| Green Bell Pepper 🌶️ | 1 whole | Diced into 1/2-inch pieces |
| Sturdy Cucumber 🥒 | 1 whole | Seedless, diced into 1/4-inch pieces |
| Black Olives 🫒 | ½ cup | Pitted, sliced into halves |
| Shredded Mozzarella Cheese 🧀 | 1 ½ cups | Part-skim or whole milk |
| Dry-Cured Salami 🥓 | ½ cup | Thinly sliced, optional for protein |
| Red Wine Vinegar 🍷 | ¼ cup | For tangy dressing |
| Extra-Virgin Olive Oil 🫒 | ½ cup | High-quality, fruity |
| Diamond Crystal Kosher Salt 🧂 | ½ tsp | For seasoning dressing |
| Fresh Dill 🌿 | ¼ cup | Chopped, for garnish |
| Garlic Cloves 🧄 | 2 cloves | Minced for dressing |
| Lemon Juice 🍋 | 1 tbsp | Freshly squeezed |
The bell peppers and cucumber are the foundation of crispness—look for firm, vibrant produce at Whole Foods or your local farmers' market. The salami adds protein depth, but you can substitute grilled chicken or chickpeas for a vegetarian twist. For the cheese, Sargento or BelGioioso brands shred perfectly without clumping. If you're prepping ahead, store chopped veggies in airtight containers with paper towels to absorb moisture, which keeps them crisp for up to 3 days in the fridge.
No Greek yogurt? Sour cream or vegan yogurt works in a pinch, though texture will differ slightly. The red wine vinegar should be aged for maximum tang—skip the cheap stuff. For a vegetarian option, swap salami for marinated artichoke hearts or roasted red peppers. The dressing can be made a day ahead, but hold off on mixing it with the salad until serving to maintain texture. If you prefer extra crunch, add 1/4 cup toasted pine nuts or crumbled feta cheese to the top layer.
Assemble the salad in a glass baking dish (at least 9x13 inches) to keep layers intact. Start with pasta as the base, then alternate wet and dry ingredients—this prevents sogginess. Cover tightly with plastic wrap and refrigerate for at least 2 hours before serving to let flavors meld. This salad holds beautifully for 5 days in the fridge, making it perfect for meal prep. For serving, garnish with fresh dill and a drizzle of extra-virgin olive oil to elevate presentation.
Why You'll Love This Recipe
- I swear by this trick: just slice the bell peppers into thick strips—no dicing, no fuss. The yogurt-sour cream combo keeps everything creamy without the mayo mess, and the rotini holds up perfectly. (Yes, even the picky eaters in my family stop complaining.)
- No-Chop Needed: I swear by this trick: just slice the bell peppers into thick strips—no dicing, no fuss. The yogurt-sour cream combo keeps everything creamy without the mayo mess, and the rotini holds up perfectly. (Yes, even the picky eaters in my family stop complaining.)
- Creamy Without Guilt: That tangy Greek yogurt and sour cream layer? It’s the secret weapon. No heavy mayo here—just rich, cool, and satisfying. The bell peppers add a sweet crunch that cuts through the creaminess every time. (I’ll take my leftovers cold or at room temp, no judgment.)
- Potluck Hero: This salad travels like a dream—no soggy pasta, no spills, and it actually looks impressive. Bring it to a BBQ, picnic, or holiday spread, and no one will guess it’s a 20-minute throw-together. (Between us, I’ve used it as a side and a main—just add grilled chicken.)
Step-by-step instructions for 7 layer pasta salad
Master the art of layered pasta salad with this method—creamy, crunchy, and perfectly balanced every time.
Cook and Cool the Pasta
Bring a large pot of water to a rolling boil and add the 1.5 cups medium rotini pasta. Cook until al dente—about 2 minutes less than package instructions. Drain immediately and rinse under cold water to stop the cooking process. This prevents the pasta from becoming mushy when layered.
Transfer the drained pasta to a large mixing bowl and let it cool completely to room temperature. I like to spread it out on a baking sheet for 10 minutes to speed up the process—this ensures your layers stay distinct and don't turn soggy from condensation. The pasta should be cool enough to handle without being clammy.
Prepare the Creamy Dressing
In a medium bowl, whisk together the 1 cup plain Greek yogurt, 0.5 cup sour cream, 0.25 cup red wine vinegar, 0.5 cup extra-virgin olive oil, 2 cloves minced garlic, 1 tablespoon lemon juice, and 0.5 teaspoon diamond crystal kosher salt. The mixture should be smooth and slightly thick—if it looks too stiff, whisk in 1 tablespoon cold water to loosen it.
Taste and adjust seasoning—this is your flavor base. The yogurt and sour cream create a rich, tangy dressing that won't turn greasy like mayo-based salads. I find that adding the lemon juice at the end brightens the flavors and balances the richness of the dairy. Set the dressing aside until you're ready to assemble the layers.
Build the Layered Salad
In a 9x13-inch glass baking dish, begin with a ¼-inch layer of the cooled pasta. Press it down gently to create an even base. Next, sprinkle ¼ cup shredded mozzarella cheese evenly over the pasta, followed by ¼ cup sliced black olives and ¼ cup thinly sliced dry-cured salami. This first layer establishes the cheesy, savory foundation.
Add another ¼-inch layer of pasta, then repeat with the remaining 1 cup mozzarella cheese, ¼ cup olives, and ¼ cup salami. The key here is to work quickly—don't overmix or press down too hard, or you'll lose the distinct layers. I like to use a rubber spatula to spread each ingredient evenly without disturbing the layers below.
Add Vegetable Layers and Dressing
Dice the 1 whole red bell pepper and 1 whole green bell pepper into ½-inch pieces, and the 1 whole sturdy cucumber into ¼-inch pieces. Toss them lightly with 1 tablespoon olive oil and a pinch of salt to preserve their freshness. Spread these vegetables evenly over the cheese layer, creating a vibrant, crisp contrast.
Pour the prepared dressing over the vegetables, allowing it to seep down between the layers. The yogurt base will create a creamy, cohesive texture without overwhelming the fresh vegetables. Sprinkle the 0.25 cup chopped fresh dill evenly over the top—this adds a bright, herby finish that complements all the flavors.
Chill and Serve
Cover the dish tightly with plastic wrap and refrigerate for at least 4 hours, or preferably overnight. This chilling time allows the flavors to meld perfectly and the layers to set. The pasta will absorb the dressing evenly, creating a harmonious balance of textures—creamy, crunchy, and chewy all in one bite.
Before serving, give the salad a gentle stir with a fork to redistribute any settled ingredients. The layers will still be visible but more integrated. Garnish with additional fresh dill if desired, and serve chilled. Each bite should deliver a perfect sequence of flavors—tangy dressing, creamy cheese, briny olives, and fresh vegetables—making every mouthful a complete experience.
Pro Tips For Making 7 Layer Pasta Salad
- RINSE THAT PASTA: Drain your rotini and give it a quick cold-water rinse—even if it looks dry. I learned this the hard way: unrinsed pasta clumps when mixed with yogurt and sour cream, turning your layers into a gluey mess. A 10-second rinse keeps the pasta loose and ready for stacking. ---
- CHAR THE BELL PEPPERS: Blacken those bell pepper strips under the broiler for 2-3 minutes before slicing—yes, even if they’re fresh. The smoky char depthens the flavor and prevents them from turning mushy when mixed with the creamy layers. (Skip this, and your salad tastes like a sad office potluck.) ---
- LAYER BY COOLING: Assemble the salad in a cold dish, then refrigerate for at least 30 minutes before serving. Warm pasta and yogurt mix will separate or get watery—trust me, I’ve seen it happen. Patience here guarantees clean layers that stay put. ---
- YOGURT-TO-SOUR CREAM RATIO: Use a 2:1 ratio of Greek yogurt to sour cream (e.g., 1 cup yogurt, ½ cup sour cream) for the creamy layers. Too much sour cream makes it greasy; too little yogurt weakens the tang. I was skeptical until I tried it—now it’s my non-negotiable.
Regional styles of these flavors
Southern Comfort Style
In the South, this salad often includes corn relish and hard-boiled eggs for extra texture. I like to add 1 cup corn relish (found in the canning aisle) and 4 hard-boiled eggs, sliced, to the vegetable layer. For a smoky twist, swap the salami for smoked sausage or pulled pork, and use sharp cheddar instead of mozzarella. A drizzle of hot honey at serving time adds that classic Southern sweet heat. 🌶️
Italian-Inspired Version
For an Italian flair, replace the salami with prosciutto di Parma and add sun-dried tomatoes to the dressing. Use ricotta salata instead of mozzarella, and toss in cherry tomatoes and basil leaves for freshness. The dressing can be elevated with 1 teaspoon dried oregano and a pinch of red pepper flakes. Garnish with toasted pine nuts for crunch. This version feels like a celebration of Mediterranean flavors. 🍅
Greek-Inspired Twist
Transform this salad into a Greek-inspired dish by adding kalamata olives and feta cheese to the cheese layer. Swap the salami for grilled halloumi or sliced marinated artichoke hearts. The dressing can include 1 tablespoon lemon zest and 1 teaspoon dried oregano. Top with chopped fresh mint and a sprinkle of crumbled feta before serving. This version is lighter but packed with bright, tangy flavors. 💛
Mexican Fiesta Style
Bring in bold Mexican flavors by adding diced avocado and corn kernels to the vegetable layer. Swap the mozzarella for Monterey Jack cheese and include diced jalapeños for heat. The dressing can be spiced up with 1 teaspoon ground cumin and ½ teaspoon smoked paprika. Garnish with cilantro and crushed tortilla chips for extra crunch. This version is perfect for Taco Tuesday or fiesta gatherings. 🌮
Vegetarian Protein Boost
For a vegetarian-friendly version, replace the salami with marinated tofu or chickpeas. Add roasted red peppers and white beans to the vegetable layer for extra heartiness. Use vegan mozzarella or shredded Parmesan for a cheesy touch. The dressing can be made vegan by using vegan yogurt and vegan sour cream. This version is just as satisfying and packed with plant-based protein. 🌱
Seafood-Inspired Layer
For a seafood twist, replace the salami with cooked shrimp or smoked salmon. Add diced avocado and cherry tomatoes to the vegetable layer. The dressing can be brightened with 1 teaspoon lemon zest and a pinch of dried dill. Garnish with chopped fresh dill and a sprinkle of everything bagel seasoning for a coastal-inspired touch. This version is perfect for a light lunch or picnic by the water. 🦞
Nutrition facts
Frequently asked questions
Can I make this pasta salad ahead of time?
This recipe is designed for meal prep. Assemble all layers in your dish, cover tightly with plastic wrap, and refrigerate for up to 5 days. The flavors actually improve as they meld together. For best texture, keep the dressing separate until the final hour before serving—just toss it in right before eating to maintain crispness. Pro tip: Store chopped veggies separately in airtight containers with paper towels to absorb moisture and keep them crunchy.
Why does my pasta salad get soggy?
Sogginess happens when moisture from wet ingredients (like veggies or dressing) mixes too early. To prevent this, always cool pasta completely before assembling, and keep dressing separate until the very end. Use a glass dish so you can see each layer clearly—this helps maintain structure. Also, pat vegetables very dry with paper towels before adding them to the layers. The yogurt dressing helps too, as it's less watery than mayo-based options.
What's the best pasta shape for this recipe?
Rotini or fusilli work perfectly because their spiral shape helps hold the layers together. Other good options include penne, farfalle, or rigatoni—any shape with texture that won't flatten when layered. Avoid long, flat pasta like spaghetti or linguine, as it tends to slide between layers. Cook all pasta al dente (1-2 minutes less than package instructions) to prevent mushiness.
Can I make this vegetarian?
Yes! Simply omit the salami and replace it with marinated artichoke hearts, chickpeas, or roasted red peppers. For extra protein, add white beans or crumbled feta cheese. The dressing stays the same, but you can boost it with lemon zest or herbs like basil. This version keeps all the creamy, crunchy texture while being completely plant-based.
How do I keep the layers from mixing together?
Work quickly when assembling and use a rubber spatula to spread each ingredient evenly without disturbing the layers below. Press down gently on each layer as you go to create a solid base. For extra stability, start with a slightly thicker pasta layer at the bottom. If you're serving immediately, chill for at least 2 hours before cutting—this helps everything set. The glass dish also makes it easier to see and maintain clean layers.